How to resolve .crypto domain names
Feb 08, 2021Share this article:
Blockchain domain names are domain names launched as smart contracts on public blockchains.
What sets them apart from traditional domain names (like .com) is that blockchain domains are stored by their owners in their wallet like cryptocurrency, and no third party can change or remove them.
Also, there are no renewal fees for Unstoppable Domains names, so once you own the domain, you own it for life.
In this tutorial, we are going to take a look at Unstoppable Domains, specifically how one can resolve a .crypto domain using nothing but HTML, Javascript, and the ethers.js library.
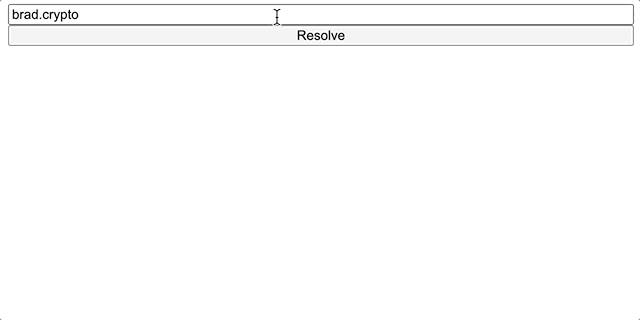
Final result
To resolve a .crypto domain, we will need to
- Tokenize the domain
- Configure Ethers.js library
- Make a call and fetch the data
Let’s visualize the resolution process using some of the simplest tools a web developer has: knowledge of HTML and javascript.
Initialize the project folder
The first thing we need to do is create a folder with three files inside: index.html, index.js, and ethers.js.
$ mkdir crypto-resolution$ cd crypto-resolution$ touch index.html index.js ethers.js
Your project folder should look exactly like the following:
.├── index.html├── index.js├── ethers.js
Index.html
Let’s open the index.html file and build out the layout for our app.
To create a positive UI experience for the user, we’ll need to build an input bar, a button to trigger the resolution and a <div> to display our records.
Next, we’ll need to connect js-sha3 (so that we can use the keccak_256 hash function) and ethers.js to communicate with the blockchain contract.
We will need the keccak_256 hash function to calculate ERC-721 token ID for the.cryptodomain. To see a full description of this process, read ournamehashing article.
<!DOCTYPE html><html lang="en"><head><meta charset="utf-8"><title>Basic .crypto integration</title></head><body><div id="main" style="display: flex;flex-direction: column;height: 100vh;"><input id="input" /><button onclick="resolve()">Resolve</button><div id="records" style="display: flex; flex-direction: column;"></div></div><!-- This exposes keccak_256 hash function --><scriptsrc="https://cdnjs.cloudflare.com/ajax/libs/js-sha3/0.8.0/sha3.min.js"integrity="sha512-PmGDkK2UHGzTUfkFGcJ8YSrD/swUXekcca+1wWlrwALIZho9JX+3ddaaI9wmmf8PmgDIpMtx6TU8YBJAZS0mPQ=="crossorigin="anonymous"></script><!-- This exposes the ethers.js library as a global variable: ethers --><script src="https://cdn.ethers.io/lib/ethers-5.0.umd.min.js"type="application/javascript"></script><!-- This are our custom files --><script src="ethers.js"></script><script src="index.js"></script></body></html>
Index.js
Now that we have our index.html file set up, let’s add some javascript. We can start by inputting some basic code into our index.js file to capture the text from the input field and print it onto our console.
async function resolve() {const userInput = document.getElementById("input").value;console.log({ domain: userInput });}
We can openindex.htmlin a browser to make sure everything is connected and launches.
Tokenize your domain by namehashing
Namehashing is an algorithm that tokenizes your domain name in a way that the .crypto smart contract can understand.
To tokenize our domain, we’ll need to split the domain name by the “.” character into separate labels, reverse the array, and reduce it to a single hash. We can do this by implementing a recursive hash function.
We’ll also want to implement an arrayToHex function to get the result as a string, as well as a wrapper function namehash.
function namehash(name) {const hashArray = hash(name);return arrayToHex(hashArray);}function hash(name) {if (!name) {return new Uint8Array(32);}const [label, ...remainder] = name.split('.');const labelHash = keccak_256.array(label);const remainderHash = hash(remainder.join('.'));return keccak_256.array(new Uint8Array([...remainderHash, ...labelHash]));}function arrayToHex(arr) {return '0x' + Array.prototype.map.call(arr, x => ('00' + x.toString(16)).slice(-2)).join('');}
Here is the list of expected results with some inputs:
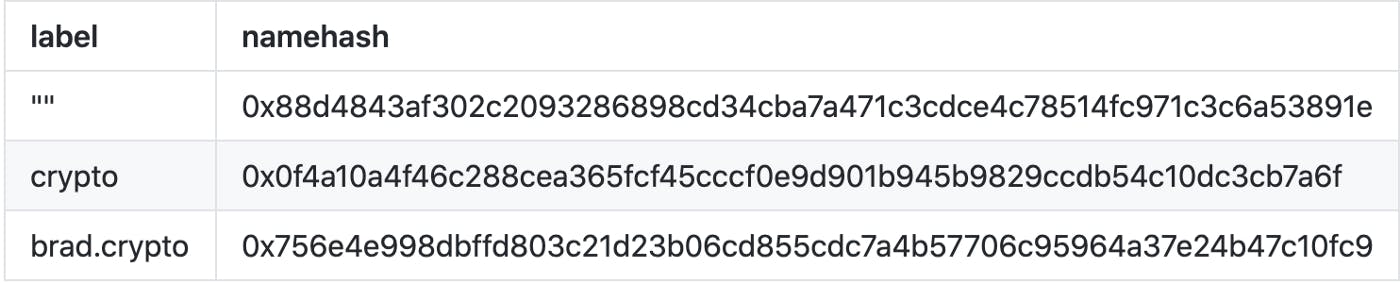
Namehash examples with different inputs
Configure the Ethers.js library
To talk with any blockchain contract using ethers.js, we need to know the following:
- Contract address
- Contract ABI
- Ethereum provider
Let’s add the following information to our ethers.js file:
var address = '0xa6E7cEf2EDDEA66352Fd68E5915b60BDbb7309f5';var abi = [{constant: true,inputs: [{internalType: 'string[]',name: 'keys',type: 'string[]',},{internalType: 'uint256',name: 'tokenId',type: 'uint256',},],name: 'getData',outputs: [{internalType: 'address',name: 'resolver',type: 'address',},{internalType: 'address',name: 'owner',type: 'address',},{internalType: 'string[]',name: 'values',type: 'string[]',},],payable: false,stateMutability: 'view',type: 'function',}];var provider = ethers.providers.getDefaultProvider('mainnet');
For the scope of this project, we will only need to use the getData function from the Unstoppable Domains contract.
Next, we’ll need to create a contract instance and create a function to query our contract.
var contract = new ethers.Contract(address, abi, provider);async function fetchContractData(keys, tokenId) {return contract.getData(keys, tokenId);}
By inspecting the contract’s getData function interface, we can see that it requires from us anarray of keysand atokenId. We can get thetokenIdby calling thenamehashfunction from above.
Although any string can be stored as a key under the domain, Unstoppable Domains hasstandardized the keysacross many applications.
For this tutorial, we will be looking up the following records:
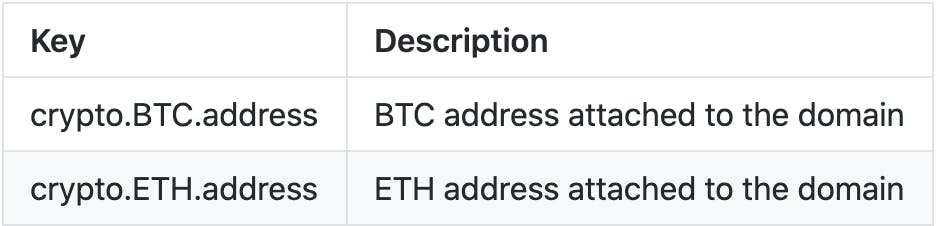
Records keys and description
Make the call to the contract
Let’s update our resolve function to use the namehash and then look up the desired record keys from the input domain name. We’ll then want to print the result in the console to inspect in more detail.
async function resolve() {const userInput = document.getElementById("input").value;const tokenId = namehash(userInput);const interestedKeys = ["crypto.BTC.address","crypto.ETH.address",];fetchContractData(interestedKeys, tokenId).then(data => {console.log({ownerAddress: data.owner,resolverAddress: data.resolver,records: data[2]});});}
If we try to resolve the brad.crypto domain with the above keys, we should see the following in the console:
{"ownerAddress":"0x8aaD44321A86b170879d7A244c1e8d360c99DdA8","resolverAddress":"0xb66DcE2DA6afAAa98F2013446dBCB0f4B0ab2842","records":["bc1q359khn0phg58xgezyqsuuaha28zkwx047c0c3y","0x8aaD44321A86b170879d7A244c1e8d360c99DdA8"]}
data[2] is an array containing all resolved records in the same order in which they were queried. In this case, the first argument is a BTC address and the last one is an ETH address attached to the domain.
Display the records
Since this is a simple example, we won’t get too fancy. We’ll just create a span element for each record containing its key and value, its owner address, and its resolver address. We’ll also want to set the font to red if the record is not found.
function cleanDOM(parent) {while (parent.firstChild) {parent.removeChild(parent.firstChild);}}function displayResolution(resolution) {const {ownerAddress, resolverAddress, records} = resolution;const mainContainer = document.getElementById('records');cleanDOM(mainContainer);const ownerRecord = document.createElement('span');ownerRecord.innerHTML = `ownerAddress: ${ownerAddress}`;const resolverRecord = document.createElement('span');resolverRecord.innerHTML = `resolverAddress: ${resolverAddress}`;mainContainer.appendChild(ownerRecord);mainContainer.appendChild(resolverRecord);Object.entries(records).map(([key, value]) => {const recordSpan = document.createElement('span');if (!value) {recordSpan.style.color = 'red';value = `No ${key} found`;}recordSpan.innerHTML = `${key} : ${value}`;mainContainer.appendChild(recordSpan);});}
Before we test it out, let’s make our lives a little easier by implementing a function to combine keys and results into one object.
function combineKeysWithRecords(keys, records) {const combined = {};keys.map((key, index) => {combined[key] = records[index];});return combined;}
Now we can easily show the records on our page:
fetchContractData(interestedKeys, tokenId).then(data => {displayResolution({ownerAddress: data.owner,resolverAddress: data.resolver,records: combineKeysWithRecords(interestedKeys, data[2])});});
If we are successful, we should see the following on our page:

Example of successful resolution
Set up error notifications
Now that we have made a successful call, let’s deal with all possible errors that might come up during the resolution.
To do this, we’ll want to create a function to place an error in our records div. We’ll also want to add a boolean argument cleanDom to remove everything from the records div before we place an error for display.
function displayError(message, cleanDom) {const mainContainer = document.getElementById('records');if (cleanDom) {cleanDOM(mainContainer);}const error = document.createElement('p');error.style.color = "red";error.innerHTML = message;mainContainer.appendChild(error);return ;}
We can easily identify the possible errors by playing around with the app in its current state.
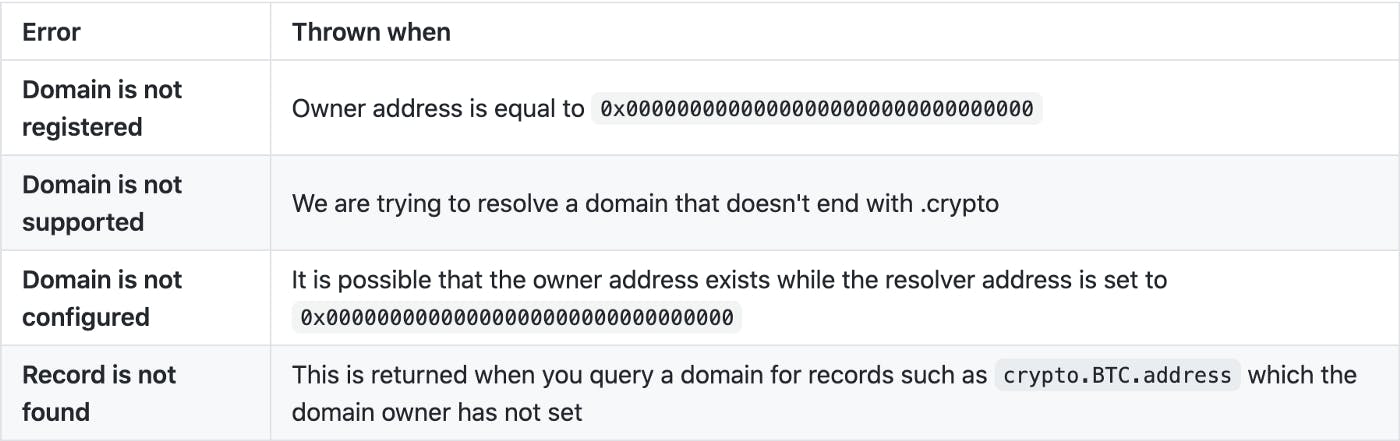
Possible errors and descriptions to them
Once we’ve identified the errors, we will need to update the callback to thefetchContractDatafunction to show the errors to the user.
function isEmpty(msg) {return !msg || msg === '0x0000000000000000000000000000000000000000';}async function resolve() {const userInput = document.getElementById("input").value;if (!userInput.endsWith(".crypto")) {displayError('domain is not support', true);return ;}const tokenId = namehash(userInput);const interestedKeys = ["crypto.BTC.address","crypto.ETH.address",];fetchContractData(interestedKeys, tokenId).then(data => {if (isEmpty(data.owner)) {displayError('Domain is not registered', true);return ;}if (isEmpty(data.resolver)) {displayError('Domain is not configured', true);return ;}displayResolution({ownerAddress: data.owner,resolverAddress: data.resolver,records: combineKeysWithRecords(interestedKeys, data[2])});});}
Now you can resolve any .crypto domain and display the appropriate error message to your users. Just open the index.html file in your browser and play around with the results to get a better sense of the types of errors that may come up and the types of error messages you might want to include.
For example, you can try to resolve the following domains:
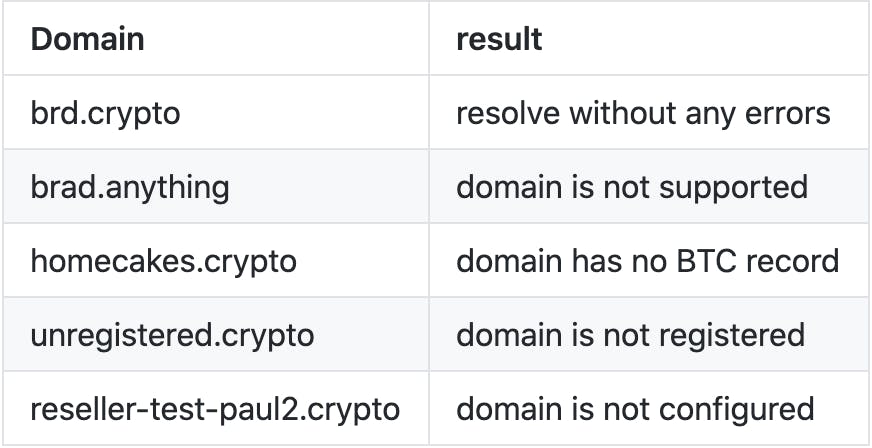
Domain examples
Links
If you have any questions, please visit our Unstoppable Domains Developer Community on Discord.